Do It Yourself - How to DIY (warnings, tips, tools, methods, ... etc.)
Introduction
"Doing It Yourself" has become a way of life for me. I grew up with lots of tools arround me and
I have made sure that my children has done the same. Houses, cars, motorcycles, aircrafts, tools,
electrical machines. There is not much that I have not worked on over the years. Having fun,
saving money, understanding technology are just a few of the rewards it brings.
There are however a number of stumblestones on the way. Some you learn about through mistakes
and others you learn about through good advice from others. The purpose of this doucument is to
help you with such good advice. And most importantly: if you have a good tip
that is not mentioned in this article, please send me a mail about it.
The first advice is a warning about safety and risk: Be aware that you carry
the full responsibility yourself for any mistakes and mishaps in relation to your own DIY work
 . There is nobody except yourself to pay any extra
costs and there is no warranty. In certain cases your DIY work might cause the manufactures warranty
to be lost. So consider this carefully before you begin, and keep it in mind whenever you might get
tempted to do second class work.
. There is nobody except yourself to pay any extra
costs and there is no warranty. In certain cases your DIY work might cause the manufactures warranty
to be lost. So consider this carefully before you begin, and keep it in mind whenever you might get
tempted to do second class work.
On the other hand there is a very positive side to the DIY work: You know with certainty what
have been done and how well it was done.
This document is still neither comprehencive nor complete, but as time allows, I expect to let
it grow. Although having focus on motorcycles and cars, the contents is applicable on many other
DIY areas, as it is always just about how the physical world arround us behaves.
Tools - Do Not Buy Cheap Tools !
Always buy the right tool for the job and buy expencive high quality tools rather than cheap
unknown brands. Many of my tools were bought more than 30 years ago and are still in perfect
condition! 
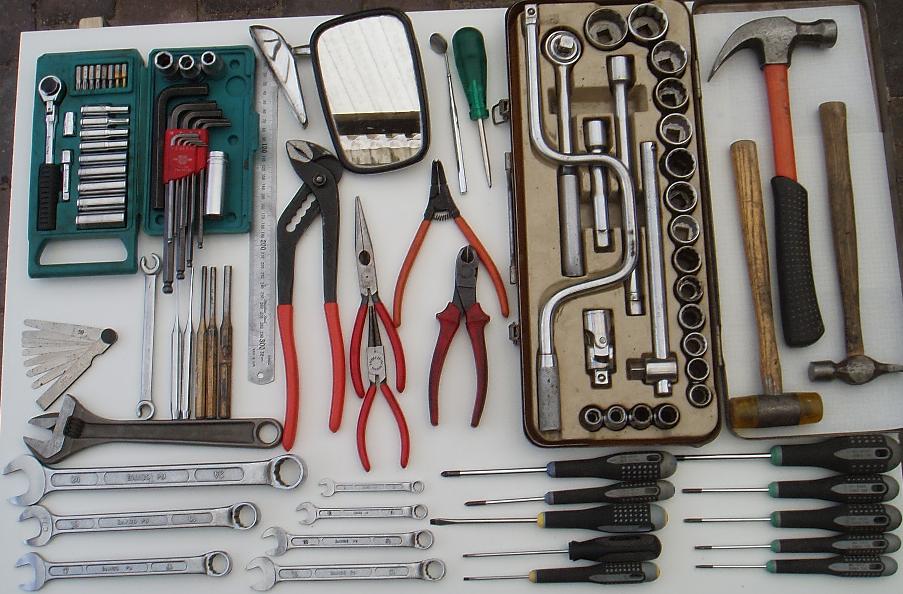
You will need the following tools for mc and car work (most important mentioned first):
- Rowling keys (ring and fork wrenches) (6, 7, 8, ... 35 mm)
- 1/2" socket wrenches (10, 11, 12 ... 23, 24, 27, 30, 32 mm)
- 1/4" socket wrenches (4, 5, 6, ... 13 mm)
- torx screw drivers (T8, T10, T15, T20, T25, T27, T30, T40)
- flat screw drivers (3, 5, 8 mm)
- pozidrive screw drivers (1, 2)
- allen keys (1.5, 2, 2.5, 3, 4, 5, 6, 8, 10 mm)
- pliers (short broad beak, round beak, long narrow beak)
- mandrel (2, 3, ... 10 mm)
- awl (pricker ?)
- hammers (small, large, plastic)
- tweezers
- tourge wrench
- chisel
- multimeter to measure voltage, current and resistance
- mirror
- torch
In case the terms I used in the above list are not all correct, please have a look on the image
here below which gives examples on most of the items.
Keep your tools dry and covered with a thin layer of oil. The oil will usually be applied when
you work with the tool, but if not, then smear oil on with a rag and dry most of it off again with
another rag.
Consumables
You will need the following consumables for mc and car work:
- chain lubricant spray
- engine oil
- coolant
- brake fluid
- grease
- copper grease
- silicone grease
- lubricant spray with PTFE (teflon)
- petrol for cleaning
- thread locking compound (medium strength)
- sealer: silicone RTV sealant (RTV = Room Temperature Vulcanisation)
Preventing Stuck Bolts, Nuts and other Metal Parts
Have you ever spent hours trying to unmount a corroded bolt, nut or other steel part. Have you
broken a bolt or destroyed the bolt head so your tools can no longer get a hold
. This does�nt have to be so, at least not if you
follow the following simple advice:
Apply copper-grease or normal grease on all threads and mating surfaces before you
mount steel parts, Only exceptions are in special cases like when a special locking compound is
required or some other circumstance dictates not to do it. Grease protects against corrosion and
reduces friction when you later need to unmount. The copper in cobber grease is especially effective
on high temperature parts like on the exhaust. It takes only a few seconds extra to apply the grease,
and you will save hours and spare parts when you five years later needs to do maintenance
on that spot again. When mounting parts on the underside of e.g. a car I also apply a good amount of
grease on all bolts, nuts and threads after assembly is finished.
Undoing Stuck Bolts, Nuts and other Metal Parts
What to do then if the parts are stuck together due to corrosion because someone (you) forgot to
follow the above advice? There are a number of things which can help you: The right tool, vibration,
temperature, oil, force and deliberate destructive action. You can use the methods in combination,
but for simplicity, let's take them one-by-one:
- the right tool:
Use a hexagonal top rather than a top with 12 positions. It is less likely to deform
the bolt head.
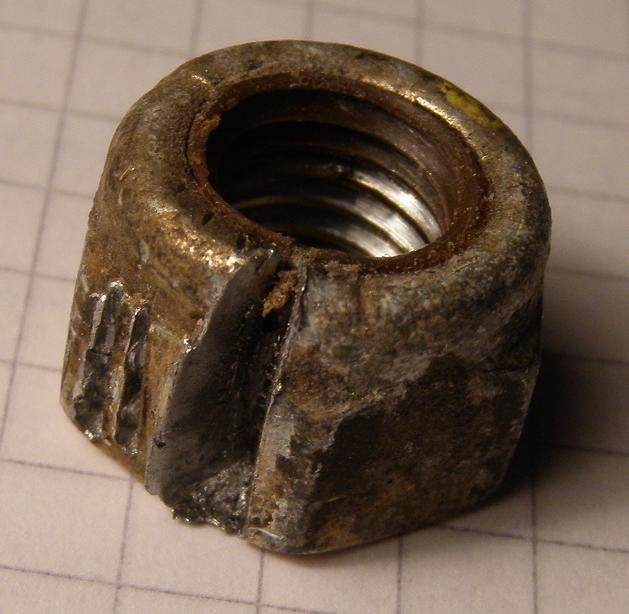
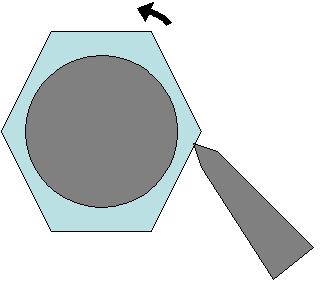
Large diameter nuts with a small difference between inner and outer diameter often
presents you with a special problem: They are compressed by the wrench when you
try to apply tourge, so they just get extra stuck the more you try to turn them.
Instead you shall use a sharp chisel and a hammer to turn the nut. Hold the chicel
in a tangential direction and place the sharp edge near one of the edges. When you
now apply strokes with the hammer, the chisel will cut a little grove into the nut
material and send mechanical shock waves arround the nut causing it to turn.
- vibration:
Rust (iron oxide) is brittle. Hence you can use vibrations to get it loose. Strike
the bolt head several times with a hammer  .
Each strike sends mechanical shock waves down along the bolt cracking the iron oxide.
Next use a pneumatic spanner with a hexagonal top. Or - if you do not have a pneumatic
spanner - simply use a hammer on the manual spanner (be sure to hit it in the correct
direction though). Again it is the vibrations (sound waves) which will do the job.
.
Each strike sends mechanical shock waves down along the bolt cracking the iron oxide.
Next use a pneumatic spanner with a hexagonal top. Or - if you do not have a pneumatic
spanner - simply use a hammer on the manual spanner (be sure to hit it in the correct
direction though). Again it is the vibrations (sound waves) which will do the job.
- temperature:
Heating and cooling causes size variations in steel. These variations can crack iron
oxide and loosen stuck mating faces. Heat the nut and cool it down, optionally with
several cycles. You can conveniently use a spray with rust remover to cool it down.
Besides cooling the material, the rust remover can penetrate small cracks and
lubricate the nut or bolt that you are trying to unmount.
- oil:
Lubricate with oil or a spray with rust remover.
- force:
Be carefull with using to much force. You will just end up breaking the bolt. Try
the above methods first or even consider the deliberate destructive method below
before you go extreme. And when you finally use large force, be sure to do it in
combination with the above mentioned methods.
- destructive action:
Rather than breaking the bolt in some uncontrolled manner, it is often better to
simply cut the nut off and replace it with a new one. Use a special nut cutter tool
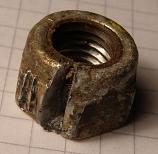
or a chisel, or saw it off with a saw or a grinding tool. The nut shown below left
was cut off with a chisel, beacause I could not get access with a top spanner.
The oil filter shown below right was impossible to loosen with a standard oil
filter wrench. I had to loosen it with a screw driver punched through the filter
(read more here).

If a bolt is stuck and the head has broken off or your tool can not get a sufficient
grip in the bolt head, you may use one of theese methods:
1) In this first method you start by drilling a small hole - say 1.5 mm in diameter
- all the way precisely through the center of the bolt. Then drill through the hole
again using larger and larger drill diameters, untill the diameter is equal to
the inner diameter of the bolt's threads. For an 8 mm bolt that will be arround
6.5 mm. All that is left of the stuck bolt is now effectively a thin walled tube.
The tube may even come loose while you are drilling. If it has not yet come loose,
you must now drill one small hole, e.g. with 1.5 mm diameter, through the threads,
i.e. drilling just up to the edge of the large hole. This will effectively cut a slit
along the tubes wall, making the tube compressible and thus easy to 'dig' with e.g.
a sharp pointed tool. Finally cut any remains of the bolt with a thread cutting
tool of the correct threads size. The original threads of the hole are almost
preserved with this method, but not 100%, so you must be sure this is OK.
2) This method involves using a special tool with reverse threads called an "ornepik" in
Danish (I do not know the english word, but it might as the Danish word be inspired
by the shape of a boars willy!) Drill a hole in the center of the bolt and screw the
ornepik anti-clock-vise into the hole untill it gets stuck and - if the ornepik
don't break the bolt can hopefully be screwed out. If the ornepik breaks however,
you are in big trouble, because it is made by hardened steel and probably impossible
to get out again.
Chisel
A chisel is often a surpricingly effective tool when you do bodywork on e.g. a car.
The image below left shows metal parts cut off with a sharp chisel while doing body-work
on my car. A rusty console had to be replaced with a new one and was impossible to
reach with any other kind of tool. But keep the chisel sharp. I had to sharpen it
5 times before the console was removed.
The nut shown below right was cut off with a chisel, beacause I could not get access with
a top spanner.

Hand Cleaning
You do not need to spend money on special hand cleaning stuf, because you most likely
already have that available in your house. Simply dig a small amount of used coffee grains
from your coffee machine up in your dirty hand, add a little dish washing soap and rub your
dirty hands in that while also adding a little water.
Brush Cleaning
When cleaning a brush with e.g. turpentine, the procedure described below will save you a
lot of money and keep polution of the envionment to a minimum:

Always poor used terpentine into a bottle marked as USED (on the photo you can
see the Danish word BRUGT).
After a few days, the paint particles will have settled to the bottom of bottle, and then it
is magically possible to reuse the turpentine the next time you need to clean a brush if you
do as follows:
- Poor a large portion of "almost clean" turpentine from the used bottle into
a jar (the first jar).
- Poor a small portion of this "almost clean" turpentine from the first jar into a
second jar.
- Clean the brush in the second jar.
- Poor the now dirty turpentine from the second jar into the used bottle.
- Put a paper towel into the second jar an rub it arround with the brush, so both jar
and brush gets cleaned.
- Throw the now dirty paper towel into an outside garbage bin.
- Repeat steps 2..6 as many times at needed to get the brush clean.
- Repeat steps 2..6 two times, but now using only a very small portion of new
clean turpentine.
- Finished!
You will notice that only a very small portion of clean turpentine is used each time
you clean a brush, and you only rarely have any turpentine to dispose of.
External Links
lubricate control cables
Finished for now, but to be expanded some time in the future.
Front Page
© Copyright 2009 FireBladerDk - Last updated 2020-08-07