
This Do It Yourself (DIY) article describes how to remove/install the middle cowls on a 2008 CBR1000RR Honda Fireblade motorcycle. Theese cowls must typically be removed for valve clerance inspection and other work on the engine.
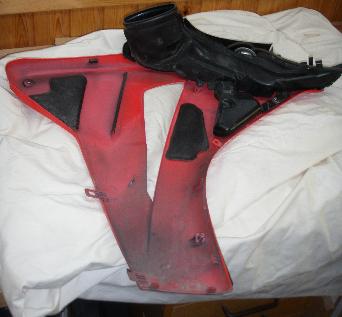
It is in fact not just the middle cowl we remove. As shown on the left image below,
the air duct is removed together with the middle cowl, and this is in fact what makes
the task simple. The lower cowl, the air intake cover and the upper inner cover are
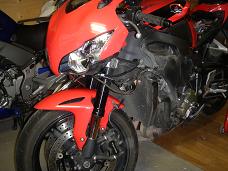
also removed during this procedure. The right image below shows the end result - a
very naked bike.


Important: The only things that require more than a little force in the below procedure, is when you press the center of some of the trim clips to release them, when you remove the IDC connector and when you pull the air duct out of the hole in the frame. All other actions require very little force if you do it right. Hence if things don't come apart when you apply gentle force, then stop and check the text and pictures again.
This is in fact an easy DIY task if you do it right, but I have seen numerous reports
about broken tabs and giving up, because people did not know the correct procedure. The
procedure in the Honda Shop Manual is correct, but it does not provide sufficient
detail for a first-timer. If you follow the text and pictures in the below procedure,
you will find that it is not at all difficult or risky.
A first timer may spend quite some time on it, say 2 to 3 hours doing it, an experienced
may do it in less than 1 hour.
Tools needed:
1.0 Remove the lower cowl - Details
2.0 Remove the air intake cover - Details
3.0 Remove the left side upper inner cover - Details
4.0 Remove the middle cowl as described in the following:
4.1 Remove the blank screw at the rear corner of the middle cowl (image below left).
4.2 Remove the black screw at the front top corner of the middle cowl (below middle).
4.3 Remove the type 3 trip clip at the front inside of the middle cowl (below right).
4.4 Remove the type 3 trip clip at the front inside of the middle cowl (image below left).
4.5 Remove the type 3 trip clip at the inside of the middle cowl (below second from left).
4.6 Remove the screw at the front bottom inside of the middle cowl (below third from left).
4.7 Remove the inner cowl (below right). At this point, make a pause and notice how the electrical harnes and vacuum tubes are routed. Notice that the electrical harness (which is visible in the above right image and in the left image further down) passes up through three black plastic arms which are part of the air duct.
4.8 Pull the harness and vacuum hose out of the black plastic holder.
Click on the left image below to see the details. The plastic holder is part of
the air duct and will hence be removed together with the middle cowl.
4.9 Release the front corner of the middle cowl from the upper cowl by gently pulling down and backwards, and subsequently upwards and out. Be very carefull not to brake the tabs and slots (image below right).
4.10 Pull the entire middle cowl forward and away from the tank. To do this you must grip arround the air duct with both hands and give it a good tug. On the left image below I have paused with the air duct only half way out and marked the pull direction with a green arrow. Notice how the front corner of the middle cowl has been lifted slightly out so it can pass the upper cowl.
4.11 Pull the middle cowl further out, so the air duct gets completely out from the hole in the frame and lift the middle cowl free of the bike and let it stand on its edge on some soft material to protect it from being scratched (image below middle and right).
4.12 Disconnect the vacuum hose under the front of the upper cowl and disconnect the 2 pin grey connector for the Intake Duct Control (IDC) solenoid valve under the upper edge of the air duct (image below left). You must press hard arround the connector body to release it, so it can be pulled off (image below middle). Now the middle cowl and air duct is completely free from the bike.
4.13 Check out behind the middle cowl: Now you have a chance to see how
your bike looks under the skin. Inspect it thorowly for damages and give it a good
cleaning. I actually vacuum cleaned some sand grains out of the air duct!
Also repair any paint and corrosion damages you might find.
4.14 Below are some extra images that I took, now I had the chance. The amount of dirt you see on these images accumulated over 3 years and some 30.000 km.
Almost the same procedure as for left side. The images below shows the details.
Installation procedure is same as removal procedure in reversed order.
Make sure harness and hoses are placed correctly as shown in the previous images.
You are invited to participate with review, questions and discussion via this thread on www.fireblades.org or this thread on www.1000rr.net.
Thanks to BigSwede on www.1000rr.net for his contribution in this post which made my work for this DIY article a hole lot easier.
See also:
How to DIY (warnings, tips, tools,
methods, ... etc.)
First Year
with my Fireblade
Superbikes on the Road: BMW S1000RR versus
Honda CBR1000RR Fireblade
© Copyright 2012 FireBladerDk 2012-02-21. Last update 2013-01-21.